General Instructions
The objective of the game is to destroy the opposing teams' units.
Each player starts with a single commander unit which is relatively powerful on its own. It works as both a builder and a combat unit. They use it to build and defend an economy with energy generators, metal extractors, storage, factories that build mobile units.
Players try to grab as much land as possible to get resources (namely scarce metal and geothermal spots that are scattered throughout the map) while trying to prevent the opponent from doing the same.
Then they use a mix of economy advantage and clever tactics to overwhelm and defeat their opponents.
Units have basic AI : armed ones will turn their turrets and engage enemies in range even when given MOVE orders, builder units set on PATROL will repair nearby friendly units and assist construction of new ones, as well as reclaim resources from nearby map features and wreckage.
NOTE: If you're looking for a way to install and play, check this.
|
|
|
|
10 Commandments
10 things to know to play MF effectively:
- 1- Use right-click-drag to move groups of units in line formation (or F-click-drag to auto-maneuver and engage enemies along the way)

- 2- Use "B" key to cycle between build menu options
- 3- Build enough energy generators to provide at least 15x energy/s as your metal income. It's used for construction, repairs and required to power some weapons and shields
- 4- There are no dedicated anti-air units. Units with light lasers and missiles are cost-effective at fighting fast units and aircraft, but deal reduced damage to commanders, defenses and most bigger units (check the armor system below)
- 5- You can start by building a construction tower near metal spots, then have it build the early base cluster while your commander moves out and expands
- 6- Morph your commander to fit your play style! Note: get 200+ energy/s generation before starting to avoid running out of energy halfway through the morph...
- 7- Use commander pads to revive your commander if it gets killed. It'll come back fully upgraded and experienced! You can also give one to allies that lost their base so they can keep fighting!
- 8- Units become considerably tougher and deal more damage as they get experience. They get experience from dealing and taking damage
- 9- Upgrade center can be used to build upgrade modules. Some permanently improve all units while others affect commanders only. You can only stack a limited number of upgrades, so choose them wisely...
- 10- Zooming out for a few seconds and checking the icons can reveal which unit types are present. Check the icons page for more information.
|
|
Controls
These are the basic controls, they also apply to most of the other SpringRTS Engine games.
note : "click" means left mouse button click, "right click" means right mouse button click
- click selects units (click-drag to select within a box)
- right click button can be used to give a default order to units selected, usually it's a MOVE order when over terrain, ATTACK order over enemy units, GUARD/REPAIR order when over friendly units
- right click-drag can be used to order a group of units to move in line formation. THIS IS EXTREMELY USEFUL
- click on the icons on build menu and then on a suitable nearby position to start building
- SHIFT shows queued orders when held and allows queuing further orders. SHIFT clicking on a factory build icon queues +5 units of that type instead of +1
- when units are selected, click on an order or use its hotkey and then left click on the target. Different units have different sets, common orders are:
- ATTACK ("A"*): attacks ground or an enemy unit (click-drag draws a circular area and queues attack orders for each enemy within, useful to target small and fast moving enemies)
- STOP ("S"): stops the unit and removes all orders from the queue
- MOVE ("M"): move command (left click-drag allows drawing line formation)
- FIGHT ("F"*): the attack-move command on typical RTS, units will move to a location but stop to track and attack enemies they find along the way (click-drag allows drawing line formation). Commanders and other builders will also reclaim wreckages and features along the way
- PATROL ("P"): similar to FIGHT, but the unit will move back and forth between the queued patrol positions
- REPAIR ("R"): repairs a unit or assists a unit under construction (click-drag draws a circular area and queues orders for each friendly unit within)
- RECLAIM ("E"): reclaims features and wreckage for resources (click-drag draws a circular area and queues orders for each neutral feature or wreckage within)
- CLOAK ("K"): toggles cloak state (on some units it also sets the fire state to "Hold fire")
- GUARD ("G"): guards a target unit, attacks whoever is attacking it (if able) and repairs it or helps build whatever it's building (if able)
- LOAD ("L"): for transports, loads a target unit (click-drag draws a circular area and queues load for units within)
- UNLOAD ("U"): for transports, unloads one of the units inside at target location (click-drag draws a circular area and unload units within, spreads them randomly)
- JUMP ("J"): perform a short flight towards the targetted position
- DASH ("D"): boost movement speed by 30-60% for a few seconds (bigger effect on relatively slow units)
(*)People familiar with RTS where "A" is the attack-move hotkey can swap "A" and "F" to match it by editing the mf_keys.txt file as explained below and uncommenting the "swap_a_f" line
- commander morph orders can be found on the second page of the orders menu
- "B" key cycles through build menu filter options
- Ctrl + click on a unit selects all units currently visible with the same name as the clicked unit
- Ctrl + "Z" selects all remaining units with name within the set currently selected
- "TAB" key toggles global overview mode
- mouse wheel controls zoom in and out
- ctrl + mouse wheel controls camera angle
Communication
- Use "ENTER" key to type chat messages and commands
- ctrl + alt + a + a toggles ally chat mode
- ctrl + alt + s + s toggles spectator chat mode
- players can use "\" + left click and drag to draw on the map, double-click to place map markers (visible to allies and spectators only). Right-click-drag deletes drawings and markers. Typing "/clearmapmarks" will instantly remove all drawings and markers.
Players can modify the key controls by manually adding and editing the mf_keys.txt file to the LuaUI/Config/ directory within their Spring data directory (typically "C:\Users\<USER>\Documents\My Games\Spring\" on Windows or "/home/<USER>/.spring/" on Linux).
(details on how it works are explained inside the example file provided in the link above)
A fallback way to modify controls that works across games but may conflict with the previous settings is manually adding and editing the uikeys.txt file to their Spring directory (typically "C:\Users\<USER>\Documents\My Games\Spring\" on Windows or "/home/<USER>/.spring/" on Linux).
|
|
Gameplay Notes
This contains a list of gameplay notes.
Some of them are written in comparison to other SpringRTS games and Total Annihilation (TA) mods.
Commanders
- Each commander has 8 distinct upgrades with unique visual and attributes
- Commanders can be respawned for 500 metal and 30s, but the duration and cost scales up to 2x depending on upgrades and morph status (respawner pad can be built by any constructor for 200 metal)
- Experience and upgrade state is restored on every respawn (they get stronger as the game progresses)
- Commanders have a small death blast (unlike many TA-derived games)
- They have unique weapons instead of the 1-hit-kill dgun and morph one of them into a torpedo launcher while underwater (unlike many TA-derived games)
- No decoy commanders
Economy
- Players start with 1500 metal and 4000 energy and get free 10 M/s and 100 E/s baseline economy
(building a few extractors and energy generators before the first factory is still recommended)
- Commanders and construction towers can build all level 1 (L1) buildings and level 2 (L2) factories
- Construction units are relatively more expensive but build faster individually relative to other TA-derived games
- The tech-tree is relatively flat, with many options but only two levels. L2 builders or the construction drone upgrade can build L2 buildings, which add:
- Expensive but more efficient resource production structures
- Intelligence buildings like very long range radars, jammers and Comsat stations
- Heavy static defense and very long range artillery
- Geothermal powerplants are the most cost-effective resource production structure available, but can only be built on specific locations
- Wind generators produce up to +40% energy if built on relatively high ground (relative to the lowest metal spot altitude)
- Advanced metal extractors provide between 2.5x and 3.3x as much metal/s as basic ones on a given spot, but drain a significant amount of energy to operate
- The metal extraction rates can be improved by building power nodes with overlapping radiuses grouping both energy production units and metal extractors. Bonus increases with linked energy production and storage and decreases with the amount of linked extraction power, but in a way that makes it more advantageous to add new spots to the grid than to increase the bonus through energy production
- There are L2 ENERGY->METAL converters but they're the least efficient way to increase the metal income
- Wreckages have two stages (the first provides 30% of the original unit's metal cost, the second 9%)
- In summary, players should try to, from most cost-effective to least:
- 1- Capture as much territory as possible, reclaim metal from wreckages with construction units
- 2- Set up production on new metal and geothermal spots (if they can be protected)
- 3- Build advanced metal extractors on safer areas and set up energy production to support them
- 4- Link energy production and metal extraction buildings and expand energy production to increase the bonus, to some extent (diminishing returns)
- 5- Add energy->metal converters to use excess energy
Damage : ARMOR vs POWER
- Light (L) (takes full dmg from all sources)
- Medium (M) (takes half dmg from light power weapons)
- Heavy (H) (takes half dmg from medium power weapons and quarter dmg from light hitpower weapons)

In this context, "power" category refers to a weapon's ability to pierce and degrade enemy systems when matched against their "armor" category.
Units with light lasers, small missiles and EMG deal minimal damage to heavily armored units, so even if they are cheaper, they aren't cost-effective at fighting heavy units directly (for the same reason you can't destroy heavily armored tanks and ships with machinegun fire in contemporary warfare).
Most lasers and weapons with very fast or tracking projectiles get a slight +70 range boost while engaging air units.
You can view the unit's armor type and weapon hit power on the tooltip. Or browse the units section here.
Taking damage reduces build and repair rates by half for 2 seconds (resource drain is halved too). This allows smaller raids to be effective even if there are enemy repair towers nearby.
There's also disruptor weapons that deal paralyze damage which scales up to 3x the base amount depending on target's % missing HP and also deal 33% base damage as normal damage.
Upgrades
All construction units can build Upgrade Centers, which can build Upgrade Modules
- Upgrade modules under construction cannot be assisted
- Upgrade modules significantly improve commanders or slightly improve all units
- The bonuses they provide are permanent and apply to all the existing and future units the player owns and builds
- Units given to another player retain the owner's upgrades until the new owner builds an upgrade module
- There are currently more than 20 different upgrades which have different types and categories, some can be built multiple times. Each player can only stack up to 5 minor upgrades, 3 commander upgrades and 1 major upgrade
- They are affordable early in the game, but the limits ensure that players can't simply wait and get them all, they need to choose them wisely and pay attention to what the enemy is doing
There are also drone upgrades, which make small flying units periodically spawn above commanders and perform useful combat or support actions. They're built automatically and only drain the corresponding unit's energy cost (you do need to pay the metal cost for the upgrade once).
- Players can opt to assist construction but then need to pay the metal cost
- Small drones take 2.5s to build, medium drones take 10s, and there's a 1.5s delay between building each drone
- There's a limit for maximum simultaneous drones for each type, which is currently 3 for light drones and 1 for each of the other types, for every upgrade of that type
- Drones will automatically move around the commander and engage nearby enemies or assist friendly units
- They cannot move farther than 600 distance units away from the commander and are destroyed if the commander is destroyed
Optional Units
The units available to build for each faction can be extended by up to 6 units from a growing set that will eventually feature dozens of units.
Players get a default selection for each faction but can change them through the in-game menu (Menu > Optional Units), like shown in the picture below:
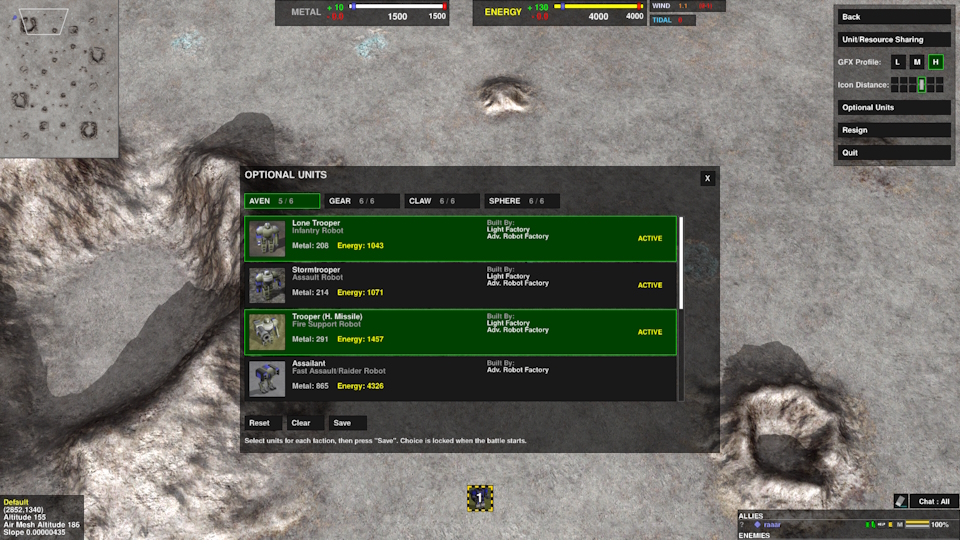
There they can click the faction and the unit rows to modify the corresponding selection. Players' choice of optional units can be modified at any time, but is locked when the game starts (the units selected at the time are labeled "ACTIVE", as shown on the picture above).
The current list of optional units can be viewed here.
Vision and Intelligence
As in many RTS games, "fog-of-war" covers the map and obstructs visibility. Players can improve their knowledge of what's happening on the map by spreading out cheap units to scout. A good early game option for that is the scout pad, which builds cheap air scouts. Ground units other than walls have 600 line-of-sight (LOS) range. Air units have 720. Enemy LOS can be avoided by using cloaking but constantly drains a considerable amount of energy, especially when moving. Cloaked units are automatically set to hold fire (use "K" hotkey to toggle) and can be revealed if they fire, are spotted by radar/sonar, get too close to enemy units, walk into water or are damaged.
Radar and sonar allow players to know of enemy troop movements far outside LOS coverage but constantly drain a small amount of energy. Commanders have a builtin 800 range radar and sonar. Radar can be countered by using radar jammer units, which generally have a much smaller radius but can make cloaked units fully invisible to LOS. It's generally a good idea to mix in one or two mobile radar jammers with armies (available on most factories which produce level2 units), especially when engaging enemies that can shoot farther than the normal LOS range. Cloakable units, combined with mobile radar jammers which also cloak, can be used to make armies fully invisible!
Scoper aircraft can be built from aircraft plants and can be used to attack positions and provide LOS in a small area around it. They're excellent spotters for artillery against enemies on hill tops and work even after the enemy has deployed radar jammers.
Comsat stations are relatively expensive, but allow the player to periodically target positions across the map and provide LOS over a wide area for 30s.
Other
- SPHERE has unit shields that protect the owner and regenerate 2%hp/s at the cost of 4%hp E/s. There are also larger area shields that do not protect against AOE damage and cost twice as much energy to regenerate (8%hp E/s). Large Shields can boost their regeneration by draining up to 2% of maximum charge per second from nearby large shields and 1% from small ones (the maximum amount drained is limited to 3x their regeneration).
Shields take full damage from all weapons
- Unit ranges are a bit higher than on similar games. Typical short-ranged raiders have about 300-400, med-ranged units have about 600-800, artillery 1000-1800. Most non-laser weapons get 2x range vertically and lasers get +80 range when firing at air targets (after they get within the original range)
- Air units are expensive. Think of them as extreme examples of fast attack units that fly out of reach of short ranged ground weapons and avoid artillery type weapons. Given the same resource investment, they're meant to lose in a direct confrontation with ground-based units (the ones that can hit them, usually armed with lasers or tracking missiles)
- Idle units regenerate HP at 2+0.2%*(max base HP) per second after 20s
Archetypes and Icons
When zooming out, or on the minimap, the icon that roughly matches each units' archetype is shown. Each icon is composed of a base that matches the unit's mobility type with an overlay that matches its main feature.
Check the icons page for more information.
|
|
AI
MFAI is the AI that works for Metal Factions
The AI options listed are named according to the convention "MFAI : <difficulty> (<strategy>)".
There are currently three difficulty modes:
- Easy : wastes time, underestimates opponents and is more prone to let units die
- Normal : the default mode, it's somewhat conservative with units and will wait until it's strong enough to overpower enemy positions before attacking
- Brutal : very agressive AI with built-in resource advantage, can be very hard to beat!
And there are several strategy options:
- no strategy specified, or "adaptable" : the default. AI will choose a random strategy from the available pool according to the chosen map (it might restrict itself to using only air or amphibious ones)
- classic : classic mode, builds a semi-random mix of land and air units (land only)
- assault : focuses on pushing with a relatively mobile land army relying on strong, but short-ranged units (land only)
- skirmisher : focuses on wearing down the enemies with a squad of relatively long-ranged fire support units (land only)
- air : relies on building up a large air swarm and raiding the opposing weak spots. Viable on almost all maps
- amphibious : relies on building up a mixed army where all ground units have amphibious capability
Note that on certain lobby versions other AI options show up. Null AI does nothing. It's there for testing purposes. Other AIs may not work properly with Metal Factions.
If you're trying to start a single player game and MFAIs aren't listed on the "add bot" options on Springlobby, try clicking on "tools" > "reload maps/games" or restarting the lobby.
AI in-game chat and mouse commands (where team number can be specified, omitting it will cause the command to apply to all allied AIs):
- CTRL-ALT-CLICK : sets AI beacon, which will make AI move its armies to attack or assist that position for a few minutes (use right click to clear)
- #AI [team number] STRATEGY <strategy> : changes AI to a specific strategy
- #AI [team number] STATUS : prints status information, namely current strategy and combat efficiency
- #AI [team number] COMPAD : gets the AI to share a commander respawner pad to the player
- #AI [team number] COMMORPH : gets the AI to morph its basic commander immediately
- #AI [team number] DEFMULT <N> : sets the AI defense density multiplier, -1 to reset
Custom AI Strategy Editor
Since v1.45 there's the option for players to use a custom set of AI strategies in addition to the ones built into the game.
More information about how to edit custom strategies and get the game to load them can be found here.
|
|